
Help & Knowledge Base
Customizing Result File Names
Special keywords can be used as placeholders in the output file names, to be replaced with dynamic values during the execution.
A trivial example is prefixing each document with the page number, when splitting.
[CURRENTPAGE]
A reference to the current page number in the input document.
Example: [CURRENTPAGE###] will generate filesnames like 001.pdf, 002.pdf.
Example: [CURRENTPAGE##] generates 01.pdf, 02.pdf, etc.
[TIMESTAMP]
Ensures unique output filenames, being replaced with current date & time.
[FILENUMBER]
Ensures unique output filenames, replaced with a file number according to the output order.
Example: [FILENUMBER###] generates 001, 002
Example: [FILENUMBER13] starts with the counter at 13, generating 13, 14,
etc.
[BASENAME]
Does not ensure unique output filenames, and it must be used together with other placeholders ensuring unique names. It is replaced with original name of the input document, without the extension.
Example: [CURRENTPAGE]_[BASENAME] would generate 1_input-file.pdf, 3_input-file.pdf,
etc.
[BOOKMARK_NAME]
This pattern is replaced by current bookmark's name. Only applicable in the "Split by bookmarks" tool.
[BOOKMARK_NAME_STRICT]
Same behavior as [BOOKMARK_NAME] with the difference that non-alphanumberic characters are
removed.
Example: [CURRENTPAGE]-[BOOKMARK_NAME] would generate 1-Introduction.pdf, 4-Chapter
1.pdf, etc.
[TEXT]
This pattern is applicable only in the "Split by text" tool. It is replaced with the text found in the page area selected.
Example: [CURRENTPAGE]-[TEXT] would generate 1-Invoice 3456789.pdf, 4-Invoice
234567.pdf, etc.
[TEXT1], [TEXT2], etc.
This pattern is applicable only in the "Rename" tool. It is replaced with the text found in the selected area.
Example: [TEXT2]-[TEXT1] would generate John Doe-Invoice 3456789.pdf, Jane Doe-Invoice
234567.pdf, etc.
Sejda Desktop Enterprise Install
To deploy Sejda Desktop in an enterprise environment using a pre-configured volume license key use this command:
msiexec /i sejda-desktop_x.y.z_x64.msi LICENSE_KEY="1234-ABCD-1234-ABCD"
Any options provided will be configured machine-wide and will apply for all users on the system.
| LICENSE_KEY | License key | LICENSE_KEY="1234-ABCD-1234-ABCD" |
| LOCALE | UI language | en, es, de, fr,it or pt |
| UPDATE_CHECK | Disables checking for new versions | UPDATE_CHECK="false" |
| DISABLED_FEATURES | List of features to be disabled | DISABLED_FEATURES="edit.whiteout" |
| EULA_ACCEPTED | Accept EULA and no longer prompt on first use | EULA_ACCEPTED="true" |
| AUTO_REPORT_ERRORS | Configure automated error reporting and no longer prompt on first use | AUTO_REPORT_ERRORS="false" |
Resetting Browser Zoom
Choosing a zoom level of anything other than 100% (the default) can cause problems in pages where we render PDF pages.
If you are warned about it, reset the browser zoom to 100%.
The quickest way to return your browser to this zoom setting is to use the keyboard shortcut Ctrl + 0 on Windows or Cmd + 0 on Mac.
Additional browser-specific instructions for changing the zoom level are detailed below.
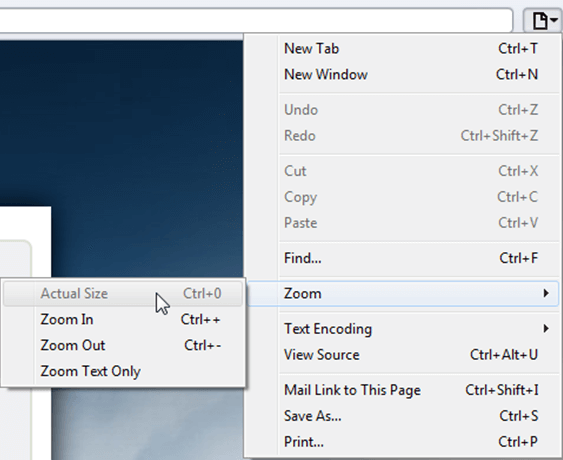
Chrome

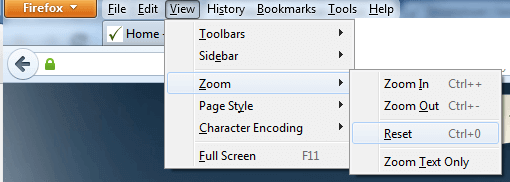
Firefox
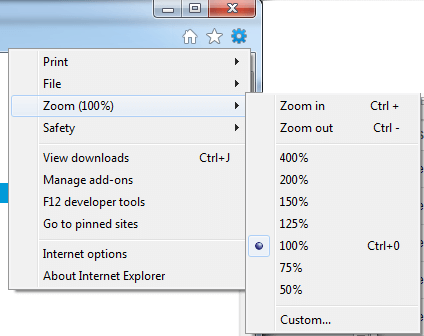
Internet Explorer
Safari
Sejda Desktop - Loading local fonts failed
Sejda Desktop fails to load the fonts installed on your system?
Windows 7: Please install "Platform update for Windows 7 SP1": https://support.microsoft.com/en-us/kb/2670838.
Linux: Please install libfontconfig-dev: sudo apt-get install libfontconfig-dev
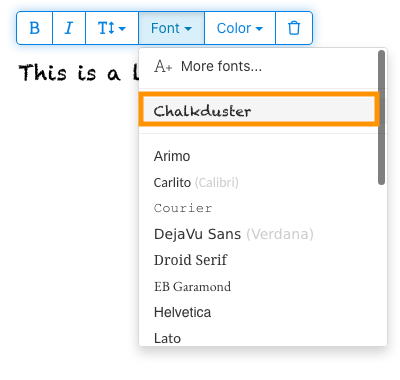
Sejda Desktop - Add your fonts
Sejda Desktop can use your custom fonts when editing PDF documents.
1) Install the font on your system. See help for Windows or Mac.
2) Open Sejda Desktop, then open a PDF document with the Editor.
3) Type text on the page. From the context menu select "Fonts > More fonts".

4) Select the font you would like to use and click "OK".
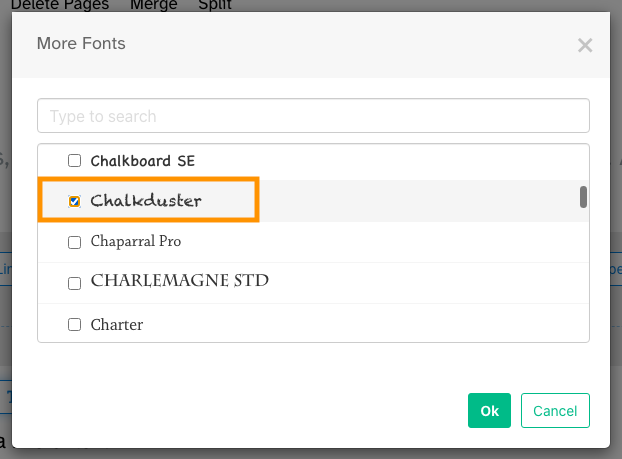
5) Click on the newly added font to use it for your text.
How long does it take for a refund to be processed?
It can take anywhere from 5-10 business days for a refund to show up on your bank account.
In some cases, the refund might be processed as a reversal, meaning the original payment will disappear from the account statement entirely and the balance will reflect as though the charge never occurred.
If you do not see the refund after 10 business days and you are still seeing the original charge on your bank statement, please reach out to support for more information.
How can you delete your FastSpring data?
If you've placed an order through FastSpring, our online authorized reseller & merchant of record, you can send your data erasure request to privacy@fastspring.com.
Malwarebytes interfering with Sejda Desktop?
Do you have Malwarebytes installed?
Please try temporarily turning Malwarebytes off and see if that solves the problem: Instructions here
You can report this problem with Malwarebytes: Report false positive
Could not convert: Page uses CAPTCHAs
The website you are trying to convert uses CAPTCHAs to block automated robots (such as our converter) from visiting their website.
There is no work around this.
See if the browser extension helps with your use-case:
HTML to PDF browser-extension
Install Linux OCR engine
Sejda Desktop does not ship with an embedded OCR engine on Linux, it uses the one available on the system.
To install an OCR engine, please run the following command:
sudo apt-get install -y tesseract-ocr tesseract-ocr-all
Once the command completes, return to Sejda Desktop and run your OCR task again.
Install Linux OCR language data
The OCR engine is installed successfully, but it is missing language data.
To install language data, please run the following command:
sudo apt-get install -y tesseract-ocr-all
About 667M of data will be downloaded and installed.
Once the command completes, return to Sejda Desktop and run your OCR task again.
Tôi bị yêu cầu nhập owner password
Tại sao tôi bị yêu cầu nhập mật khẩu?
Một số tài liệu PDF có cài đặt bảo mật hạn chế các thao tác nhất định, như in, sao chép văn bản, chỉnh sửa hoặc thêm chú thích. Các hạn chế này được người tạo tài liệu thiết lập để kiểm soát cách nội dung được sử dụng và chia sẻ.
Khi phát hiện PDF có các hạn chế này, chúng tôi sẽ yêu cầu bạn nhập owner password. Nhập mật khẩu này sẽ mở khóa tài liệu và cấp quyền truy cập đầy đủ vào tất cả tính năng và quyền hạn. Bước này đảm bảo rằng chỉ những cá nhân được ủy quyền mới có thể sửa đổi hoặc loại bỏ các hạn chế do tác giả gốc thiết lập.
Owner password là gì?
Owner password được người tạo PDF thiết lập để ngăn chặn các thay đổi trái phép đối với tài liệu. Nó khác với user password, vốn dùng để hạn chế việc mở tài liệu hoàn toàn. Nếu bạn có owner password, nghĩa là bạn có toàn quyền đối với tài liệu.
Nếu tôi không có owner password thì sao?
Nếu không có owner password, bạn sẽ tiếp tục bị hạn chế quyền truy cập dựa trên các cài đặt trong PDF.
Để có toàn quyền truy cập, hãy lấy phiên bản đã mở khóa của tài liệu.
Làm thế nào để tránh phải nhập owner password lặp đi lặp lại mỗi lần?
Bạn có thể dùng công cụ PDF unlocker để loại bỏ các hạn chế về quyền khỏi tài liệu. Bạn chỉ cần làm việc này một lần. Sau đó, bạn sẽ không bị hỏi owner password cho tài liệu đó nữa.
Mở PDF trong Google Chrome, nhấn Ctrl+P để in, chọn "Destination" là "Save as PDF" ở góc trên bên phải, rồi nhấn "Save".
Mua gói trả phí có giải quyết được vấn đề không?
Không, bạn vẫn sẽ bị hỏi owner password ngay cả khi bạn dùng gói trả phí của chúng tôi.
Bạn có thể cho tôi biết owner password không?
Không, chúng tôi không biết owner password của tài liệu của bạn. Owner password do người tạo tài liệu chọn, và nó khác với mật khẩu đăng nhập của bạn.
Tôi không thể chỉnh sửa hoặc chuyển đổi tài liệu đã scan
Tại sao tài liệu đã scan không thể chỉnh sửa hoặc chuyển đổi?
Khi bạn scan một tài liệu vật lý để tạo PDF, máy quét sẽ chụp lại hình ảnh của từng trang. Quá trình này chuyển đổi văn bản, đồ họa và bố cục thành một file hình ảnh duy nhất được nhúng trong PDF. Khác với PDF tiêu chuẩn, nơi văn bản được lưu dưới dạng các ký tự và dòng riêng lẻ, các bản PDF đã scan coi mỗi trang là một bức ảnh lớn.
Vì văn bản trong PDF đã scan là một phần của hình ảnh, các trình chỉnh sửa PDF không thể nhận dạng hoặc sửa đổi nó trực tiếp. Phần mềm chỉ thấy một tập hợp các pixel, không phải các chữ cái hay từ ngữ rõ ràng. Điều này khiến việc chỉnh sửa các đoạn văn bản hoặc thay đổi như trong tài liệu PDF thông thường là không thể.
Làm thế nào để xác định một tài liệu là bản scan?
Một cách để kiểm tra là mở PDF bằng trình xem PDF và thử dùng chuột để chọn văn bản. Trong một tệp PDF có thể chỉnh sửa, bạn có thể highlight văn bản bằng cách nhấp và kéo con trỏ qua đó. Nếu bạn không thể chọn bất kỳ văn bản nào và toàn bộ trang hoạt động như một hình ảnh duy nhất, có thể đó là một tài liệu quét.
Lưu ý: Một số tài liệu quét được xử lý bằng Nhận dạng ký tự quang học (OCR) để trở thành các bản quét "có thể tìm kiếm", nơi văn bản có thể được chọn và tìm kiếm. Tuy nhiên, những tài liệu này vẫn là bản quét và không thể chỉnh sửa hoặc chuyển đổi như PDF chuẩn.
Mình chắc chắn tài liệu của mình không phải là bản quét
Một số tài liệu giống bản quét vì nội dung của chúng được nhúng dưới dạng hình ảnh trên mỗi trang. Điều này có thể xảy ra với các tài liệu được tạo từ ảnh chụp màn hình hoặc khi văn bản đã được chuyển đổi thành outline thay vì được nhúng dưới dạng văn bản có thể chỉnh sửa.
Mặc dù về mặt kỹ thuật đây không phải là bản quét, nhưng chúng hoạt động tương tự. Rất tiếc, chúng mình cũng không hỗ trợ chỉnh sửa hoặc chuyển đổi các loại tài liệu này.
Mua gói trả phí có giải quyết được vấn đề không?
Không, việc nâng cấp lên gói trả phí cũng không giúp bạn chỉnh sửa hoặc chuyển đổi các tài liệu quét. Chỉnh sửa hoặc chuyển đổi bản quét không được hỗ trợ, bất kể cấp độ gói đăng ký của bạn là gì.
Mình chắc chắn là trước đây mình đã có thể chỉnh sửa tài liệu này
Chúng mình chưa bao giờ hỗ trợ chỉnh sửa hoặc chuyển đổi các tài liệu quét. Nếu trước đây bạn có thể chỉnh sửa tài liệu, có khả năng là nó được xuất sang PDF khác với tài liệu hiện tại.
Sejda Desktop lỗi do quyền truy cập
Có 2 nguyên nhân phổ biến cho lỗi này: không đủ quyền hoặc do phần mềm diệt virus can thiệp.
Không đủ quyền truy cập: Bạn có thể cần chạy Sejda Desktop với quyền Administrator. Nhấp chuột phải vào ứng dụng, sau đó chọn "More" > "Run as admininstrator".
Phần mềm diệt virus hoặc bảo mật: Hãy thử tạm thời vô hiệu hóa phần mềm diệt virus để xem có giải quyết được vấn đề không.
Cài đặt Sejda Desktop trên Chromebook
Sejda Desktop có thể được cài đặt trên Chromebook bằng môi trường phát triển Linux (còn gọi là Crostini).
Yêu cầu
Chromebook của bạn phải bật môi trường phát triển Linux. Để bật, hãy vào Settings → Advanced → Developers → Linux development environment và làm theo các bước thiết lập.
Không phải tất cả Chromebook đều hỗ trợ Linux. Các mẫu máy cũ hoặc cấu hình thấp có thể không có tùy chọn này.
1. Tải xuống phiên bản Linux (.deb)
2. Cài đặt trong Terminal
Mở ứng dụng Linux Terminal và chạy:
cd ~/Downloads
sudo dpkg -i sejda-desktop_*.deb
sudo apt -f install
3. Chạy ứng dụng
sejda-desktop
Hoặc khởi chạy từ thư mục ứng dụng Linux trong trình khởi chạy ChromeOS.
Khắc phục sự cố: ứng dụng không mở được
Nếu Sejda Desktop không xuất hiện hoặc không mở được cửa sổ, hãy cài đặt các thư viện GUI còn thiếu:
sudo apt install -y libgconf-2-4 libatk1.0-0 libatk-bridge2.0-0
Các tính năng OCR
Sejda Desktop trên Linux sử dụng công cụ OCR của hệ thống.
Xem Cài đặt công cụ OCR Linux để biết hướng dẫn